I receive compensation if you click on the advertisements on this blog. Thank you for stopping by and visiting my ads!


Related Posts Plugin for WordPress, Blogger...

Blog Archive

Looking for an image? Click here

Generated image
Powered by Blogger.
Showing posts with label Just Because Cards. Show all posts

Tuesday, June 28, 2011

Red, white and blue


I am loving all of the Fourth of July projects people are posting this week! This is my take on red, white and blue.

Do you remember these Rocket Popsicles? They were my favourite from the Dickie Dee ice cream cart.


To make my popsicle, I used the popsicle cut from Just Because cards and welded a rounded rectangle on the top. I cut this three times to make the three colours. Once I glued them together, I embossed the grooves. I then smothered it with Glossy Accents. The stick is a real popsicle stick, I had to pop dot it so it would be flat on top of the stick.

I am entering this card at :

1. Fantabulous Cricut - Red, White and Blue challenge

2. Celebrate the Occasion - 4th of July - Red, White and Blue

3. Scrapbookaholic Abby - Red, White and Blue

4. Craft Us Crazy - Summer or Red, White and Blue

Friday, May 20, 2011

Radish/soccer layout


I know, it's a strange combination...


For this layout, I used paper from the DCWV Market Garden stack. The journaling tags are from the stack as well.The radish is from the Just Because Cards Cricut cartridge and the font is Birthday Bash. Everything is inked with brown ink.

Thursday, October 14, 2010

Pink Stamper and Gypsy challenge

The Pink Stamper has a challenge this week to make something cute and there is a Gypsy challenge this week to make something layered. I hope this card will fit the bill for both!


I welded this coffee pot with my Gypsy to turn it into a shape card. ( I know, I'm addicted to shape cards.) The stamps I bought without a package from a yard sale but they are all super cute "coffee and tea" sentiments.

Thursday, September 23, 2010

Fantabulous Cricut Challenge #28 - Harvest Time


I have wanted to make a "You're Rad" card from the moment I opened up this paper pack from DCWV. It's the Farmer's Market stack with perfect harvest papers.


All the cuts on this card are from the Just Because Cards cartridge but none are from the radish card button other than the radish and sentiment. I used my Gypsy to weld the radish onto the card so the card would open from the right and then the left. Is this a called a gate card?


Everything is inked and I used jute as a ribbon and pop dotted the words.

Sunday, June 13, 2010

Bridal Shower projects

I have been busy! I am helping out my MIL to decorate a family bridal shower. Thankfully, the Fantabulous Cricut blog issued a "For the Bride" challenge. I tried to keep these projects simple to do with few steps because this is a large shower. I needed to make 50 invitations, 50 favor bags and 8 centerpieces.

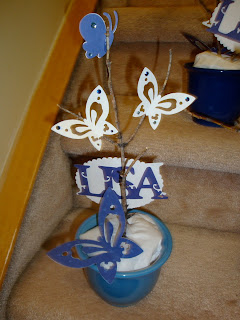
The words Bridal Shower are cut from Sweethearts and the butterfly is from the Pink Journey cartridge. I ended up using this butterfly and the colors navy blue and white as my theme.


The centerpieces were fun to make. The twigs are from my MIL's yard and the pots are from the dollar store. The butterflies are embellished with gems from the dollar store.


The banner was a last minute idea after seeing so many nice grad banners. The triangle and scallop edges are cut from Straight from the Nest.


The only cartridge I have with bags on it is Plantin Schoolbook so that's what I used for the favor bags. The Thank You stamp is from the Michael's dollar bin and the tag shape is cut from Just Because Cards. (There are many pretty shapes on this cartridge.)


I need to give credit where credit is due. My MIL helped a lot!

With a Cricut machine you can decorate a function with a stack of paper and some adhesive. In this case, the stack of paper was one of the ones Costco used to carry.

Thanks for looking.

Friday, May 14, 2010

Visiting Tinker Bell

Visiting Tinker Bell in Disney World was one of my daughter's favorite things about our trip. This is the first page of our "fairy pictures".


I am entering this layout for the SOUS challenge this week. I cut out my title for this layout and accidentally scraped all the dots to my letter "i"s off my mat. Oops! In a pinch, I grabbed the purple buttons that were near me on my scrap table and tada - completed their challenge. I'm happy to have used 5 buttons from my pound of buttons bag. Only 995 left to use up!

This layout will also be entered in the Fantabulous Cricut hopping/crawling challenge this week. For their challenge I incorporated design elements from some of the blogs on the "tour".

Stop # 2 was to journal on your die cut. My journaling tag is a shape from the Just Because Cards cartridge. I typed up my journaling thoughts and ran the die cut through the computer printer.

I am so happy that I was able to complete the fifth design element which was to use a Gypsy. I have just purchased my Gypsy and am still figuring it all out. I haven't updated it yet or even linked my cartridges. I'm really looking forward to updating my computer so I can use the Gypsy to its full potential. I used Gypsy Font for the title and welded all the letters.

Stop # 10 is to include some paper piecing. I'm not sure if putting together Tinker Bell is considered paper piecing ( I even googled the words "paper piecing") but I can tell you she has a lot of tiny bits! So I definitely did some paper piecing.

I had a fantabulous time creating this layout!

Fantabulous Cricut Entry

The Fantabulous Cricut blog is featuring a blog hopping/crawling challenge. Well, I have hopped and here is my layout. Each designer on their team requested one element on your project entry.

Stop # 2 on the hop (Brenda's Blog) requested journaling on a die cut. I ran my Cricut cut through the printer to do this (very quickly so my glue didn't dry onto my printer paper). She suggests using repositional adhesive.

Blog # 3 (Candace) was to emboss on your project. I do not own any type of embossing machine but the cookie box on the layout is beautifully embossed (kind of a damask pattern). That is why my sister purchased those particular ones.

The fourth stop was to use a negative image. (Lori's Blog) This was far out of the box for me as I usually toss the negative images. The word love is from "love you a latte" on the Just Because Cards cartridge.

The sixth stop (Nana's Blog) was to use the shadow feature for your cut. I shadowed the top note/cartouche shape. I tend to use this feature alot already.


Stop # 8 (Sammy Jo's Blog) was to ink/color/embellish a die cut. My cuts are lightly inked and I added some adhesive pearls as well.

Stop # 10 was to use paper piecing (Tammy's Blog). I had to re-piece together my word "love" with the middles of the letters.

Finally my last design element was to use a food item. (Valerie's Blog) I literally did this. I cut up a cookie favor box from my sister's wedding.


This was fun! Be sure to check out their blog and go for a "crawl"!

Sunday, May 2, 2010

First Challenge for NSD-Mother's Day Card


I have seen so many beautiful Mother's Day projects posted online. Most have flowers or butterflies or flourishes. Well, my Mother loves dogs (really loves dogs). Therefore, I pulled out my trusty Create a Critter to make a card especially for her.


I am entering this card for My Pink Stamper #1 challenge to create a Mother's Day project.

I am also entering this card in the Fantabulous Cricut Mom's Day challenge.

I Cuttlebugged the grass, therefore this card also works for the Cuttlebug blog Mom's month challenge. (I like the idea of a month celebrating Moms.)

Lastly, I have discovered a new website with challenges called The Scrap Beach. I am entering their 6th challenge posted yesterday.